在 CentOS 8 上部署基于 Django 和 Nginx 的用户注册登录系统
初識 Django
學習步驟
参考教程,搭建本地 Django server
使用 git 管理 Django,使之可衝用於服務器。
Linux 基本命令
1
2
|
pwd     # display current path
whereis [file_name] #  [file_name] means file you want to find
|
CentOS 8 防火牆的管理
在測試 Django 是否向外網提供服務時,要打開服務運行的端口。
1
|
firewall-cmd --zone=public --add-port=8000/tcp --permanent
|
安裝 nginx 后,若要從外網通過 http 服務進入主機,需要在防火牆協議里添加 http 協議,然後 reload 使之 apply。
1
2
3
|
firewall-cmd --permanent --add-service=http # permanently enable HTTP connections on port 80
firewall-cmd --permanent --list-all         # verify that the http firewall service was added correctly
firewall-cmd --reload      # apply the changes
|
如果不加 –permanent,systemctl restart firewalld 后之前的配置會消失。
於 VPS 上重新構建之前本地的 Django 項目
使用venv创建一个新的虚拟环境,确保我们的包配置与我们正在进行的任何其他项目保持良好的隔离。
1
2
3
4
|
python3 -m venv ytbkiller  # ytbkiller is my virtual environment directory name
source ytbkiller/bin/activate  # activate virtual environment
## all of your option should have (ytbkiller) before [root@vultrgues ... e.g.
# (ytbkiller) [root@vultrguest ~]#
|
从现在起,任何你使用pip安装的包将会放在 ytbkiller 文件夹中,与全局安装的 Python 隔绝开。
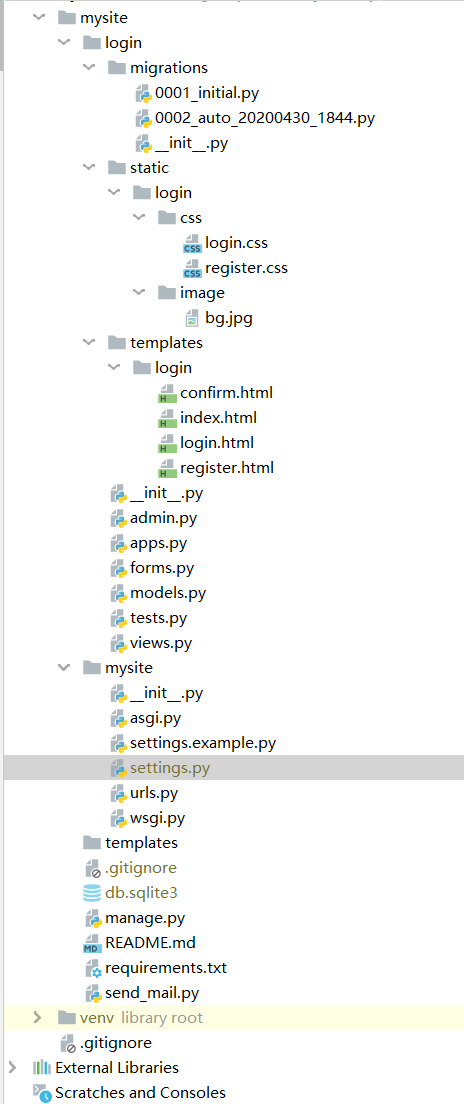
文件的目录结构如下,其中灰色的是 .gitignore 中列出的项,clone 后是找不到这些文件的,因为这些文件包含隐私数据。

 1
 2
 3
 4
 5
 6
 7
 8
 9
10
11
12
|
pip install --upgrade pip
git clone https://github.com/magictomagic/login-register
###
# 省略 cd 文件夹的操作,文件位置见上图
###
pip install -r requirements.txt # 使用pip安装第三方依赖
vi settings.example.py  # 编辑 settings.example.py 的邮箱、密码於密鑰,可以自己创建一个,组员见那个压缩包
mv settings.example.py settings.py # rename
python manage.py makemigrations # 在该app下建立 migrations 目录,并记录下你所有的关于modes.py的改动,比如0001_initial.py, 但是这个改动还没有作用到数据库文件
python manage.py migrate # 将该改动作用到数据库文件,比如产生table之类
python manage.py runserver # 启动项目,僅本機可訪問
python manage.py runserver 0.0.0.0:8000 # 外網可訪問,注意配置防火牆,開放端口
|
uWSGI 的安裝、配置和啓動
環境:CentOS 8
安裝
先參考官方教程安裝 Anaconda,注意隨着 Anaconda 的版本是不斷更新的(更新目錄),所以不能照搬我下面的命令
1
2
3
|
wget -P /tmp https://repo.anaconda.com/archive/Anaconda3-2020.02-Linux-x86_64.sh
bash Anaconda3-2020.02-Linux-x86_64.sh
# 遇到 [yes|no] 全部 yes,其它情況,全部 enter,詳情見上面的官網鏈接
|
再使用 conda 安裝 uWSGI,uWSGI在這裏充當連接 Nginx 和 Django 的橋樑。
1
2
|
conda config --add channels conda-forge
conda install uwsgi
|
配置
啓動
可能會遇到報錯:
uwsgi: error while loading shared libraries: libiconv.so.2: cannot open shared object file: no such file or directory
安裝依賴
1
|
conda install -c conda-forge libiconv
|
然後启动 uWSGI
Nginx 的安裝、配置和管理
安裝
Centos 8 的包管理工具推薦使用 dnf,不過用 yum 也可以。
配置
/etc/nginx/conf.d
管理
1
2
3
4
|
systemctl enable nginx   # 开机自启
systemctl start nginx    # 启动 Nginx
systemctl stop nginx     # 关闭 Nginx
systemctl restart nginx  # 重启 Nginx
|
已解决:单独使用 Django 访问
http://149.248.57.125:8000/
admin/
index/
login/
register/
logout/
confirm/
待解决:通过 uWSGI 连接 Django 和 Nginx
supervisor 的掃盲、安裝、配置和管理
掃盲
Linux/Unix 进程监控工具。
Why
统一管理各进程的运行,避免编写大量实现进程功能的脚本。
安裝
1
2
3
|
pip install supervisor

vi /etc/supervisord.conf
|
配置
管理
常用管理命令匯總

Author
magictomagic
LastMod
2020-05-01
License
Creative Commons Attribution-ShareAlike License

