git 裸体
概览
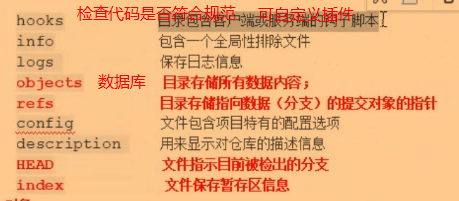
git 目录下
1
2
|
find 目录名  # 将对应目录下的 子孙文件&子孙目录 平铺在控制台
find 目录名 -type f  # 将对应目录下的文件平铺在控制台
|
初始化
1
2
3
|
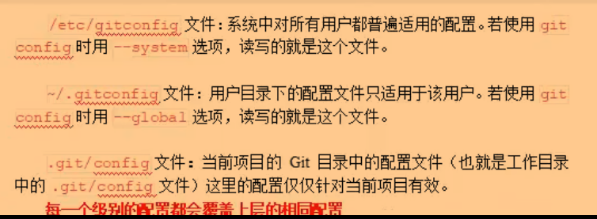
git config --global user.name "your_name"
git config --global user.email your_email
git config --list
|
基本
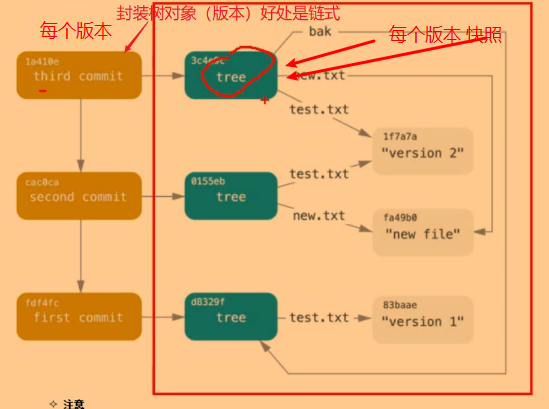
- 高层命令:由多个底层命令组成
- 区域:工作区,暂存区,版本库
- 对象:Git 对象,树对象,提交对象
 1
 2
 3
 4
 5
 6
 7
 8
 9
10
11
12
13
14
15
16
17
18
19
20
21
22
23
24
25
26
|
# 初始化仓库
git init
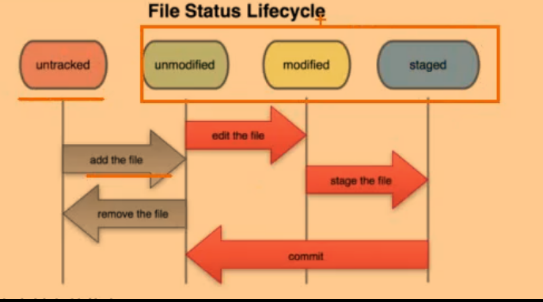
# 查看工作目录中文件的状态(已跟踪(已提交 已暂存 已修改)未跟踪)
git status
# 查看哪些修改还没暂存
git diff
# 查看哪些修改被暂存了还没被提交
git diff --staged
# 将修改添加到暂存区 && 跟踪文件(若没被跟踪commit -a 跳过暂存区不管用)
git add . # 生成 git 对象(修改了当前工作目录中的文件)
# 目标文件快照 ==> 工作目录 -> 版本库 -> 暂存区 ==> 未跟踪变已跟踪状态
# 将暂存区提交到版本库
git commit -m "xxx" # 参照暂存区,生成树对象,放到版本库(对暂存区作快照)-> 树对象 加上注释信息 包裹封装成 提交对象
# 跳过使用暂存区
git commit -a
# 查看提交记录
# 输出的 log 前面的 hash 值代表提交对象
git log --oneline
git log --pretty=oneline
|
删除.gitignore记录
.gitignore无效
git rm -r --cached .
git rm --cached filename
删除commit记录
删除.git文件夹可能会导致git存储库中的问题。如果要删除所有提交历史记录,但将代码保持在当前状态,可以按照以下方式安全地执行此操作:
尝试 运行 git checkout --orphan latest_branch- 添加所有文件
git add -A
- 提交更改
git commit -am "commit message"
- 删除分支
git branch -D master
- 将当前分支重命名
git branch -m master
- 最后,强制更新存储库。
git push -f origin master
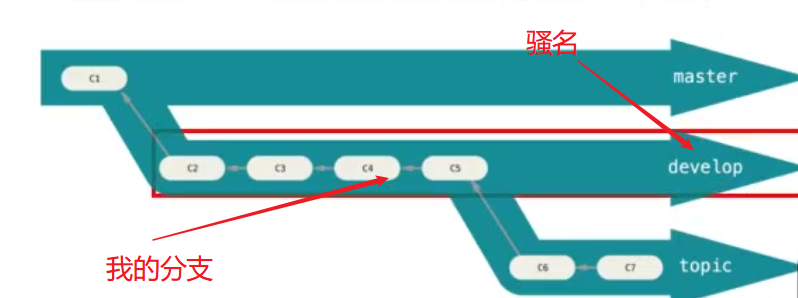
分支
原则
- 以主分支为基点
- 切换分支会改变当前工作目录中的文件,每次切换分支前,提交一下当前分支,看一下
git status,若 working tree is clean,则可checkout,否则危险(未提交的暂存第一次,污染其它分支)。
- 主分支不能动,确保新的分支代码测试成功了再提交给主分支。
- 分支模式(策略)举例:
命令
分支是活动的指针,指向最近提交对象的指针HEAD。分支的本质就是一个提交对象(没有后缀名的文件,里面存了一个 hash)。
HEAD: 是一个指针,默认指向 master 分支,切换分支时就是让 HEAD 指向不同的分支。每次有新的提交时HEAD都会带着当前指向的分支一直往前移动。
 1
 2
 3
 4
 5
 6
 7
 8
 9
10
11
12
13
14
15
16
17
18
19
20
21
22
23
24
25
26
27
28
29
|
# 创建分支 为当前所在的提交对象创建一个指针
git branch branch_name

# 在指定的提交对象上创建新的分支
git branch branch_name commithash  # 版本穿梭(时光机)

# 当前所有分支的列表
git branch

# 查看分支指向的最新提交
git branch -v  # -a 查看所有

# 删除分支(先要切换到主分支)
git branch -d branch_name  # 删除空的,已经被合并的分支
# -D 强制删除

# 切换的新分支下(若要在原来可交付的版本下添加新功能)
git checkout branch_name

# 查看整个项目的分支图
git log --oneline --decorate --graph --all

# 查看所有包含未合并工作的分支(需要在主分支下)
git branch --no-merged  # --merged 为合并过的分支,可以删除

# 分支合并
git merge branch_name
# 解决冲突:打开发生冲突的文件,看哪些代码留哪些不留
# 其它软件看复杂分支
|
命令糖
 1
 2
 3
 4
 5
 6
 7
 8
 9
10
11
12
13
14
15
16
17
18
19
20
21
22
23
24
|
# 之后可直接 commit
git rm 要删除的文件  # 删除
git mv 老文件 新文件  # 重命名

# 别名
git config --global alias.logall "log --oneline --decorate --graph --all"
git config --global alias.co checkout

# git branch name + git checkout name
git checkout -b name

# 暂存已经被跟踪的文件(保存做到一半的东西在栈上,然后就可以切换到其它分支去写代码了)
git stash

# git stash apply 恢复(相当于stack.top())+ git stash drop 删除(相当于stack.pop())
git stash pop

# git stash list 查看后恢复指定的 stash
git stash apply stash@{0}

# git show 可显示任意类型的对象: git对象,树对象,提交对象,tag对象
git show tagname

# 在master分支上修复的bug,想要合并到当前dev分支,可以用git cherry-pick <commit>命令,把bug提交的修改“复制”到当前分支,避免重复劳动。
|
后悔药
checkout 只动 HEAD;–hard 动 HEAD 而且带着分支一起走
 1
 2
 3
 4
 5
 6
 7
 8
 9
10
11
12
13
14
15
16
17
18
|
# 丢弃工作区的修改,让这个文件回到最近一次git commit或git add时的状态
git checkout -- file  # 你还没有 add
# 针对工作区 modified

# git reset 命令既可以回退版本,也可以把暂存区的修改回退到工作区。当我们用HEAD时,表示最新的版本。
git reset HEAD file  # add 了以后没有 commit
# 针对暂存区改了然后执行命令后变工作区 modified

# 上一个版本就是HEAD^,上上一个版本就是HEAD^^,当然往上100个版本写100个^比较容易数不过来,所以写成HEAD~100
git reset --hard HEAD^  # 回到上一个版本
# 也可以reflog看了之后跳到各个版本
# 少用硬重置,多用分支

# 修改提交注释
git commit --amend

# 恢复丢弃掉的分支
git branch recover-branch hash值
|
with a reset you move the current branch and the HEAD to a specific commit but with a checkout, you only move the HEAD .
git checkout branch_name与git reset --hard commit_hash:
- 都重置 HEAD,暂存区,工作目录
checkout对工作目录是安全的,reset --hard是强制覆盖checkout动HEAD时不会带着分支走而是切换分支reset --hard是带着分支走
Tag
使用此功能来发布结点
 1
 2
 3
 4
 5
 6
 7
 8
 9
10
11
12
13
14
|
# 在当前hash打标签
git tag -a "v3.4" -m "mytag"

# 在特定 hash 打 tag
git tag -a "v0.2" hash值 -m "myroot"

# 切换到 tag v3.4 (产生头部分离) ((v3.4))
git checkout v3.4

# 解决头部分离:创建一个新的分支指向那里
git checkout -b "v3.4"   # 场景是修复老版本的错误

# 查看所有tag
git tag
|
git 远程
1
2
3
|
# git 将 master 变成 main 了
git checkout -b main
git branch -M main  # 改主分支的名字
|
新建 | 删除 公共的远程分支
 1
 2
 3
 4
 5
 6
 7
 8
 9
10
11
12
13
14
15
16
17
18
19
20
21
22
23
24
|
git checkout -b "xiaohuang"
# Switched to a new branch 'xiaohuang'

echo "小黄走西口" > local.txt

git add .
# The file will have its original line endings in your working directory

git commit -m "local warehouse"
# [xiaohuang aa9b11c] local warehouse
# 1 file changed, 1 insertion(+)
# create mode 100644 local.txt

# 新建
git push origin xiaohuang
# Enumerating objects: 4, done.
# Counting objects: 100% (4/4), done.
# ...

# 推送本地分支到远程 e.g.
 git push origin no_part:no_part

# 删除
git push origin --delete xiaohuang
|
push有冲突
 1
 2
 3
 4
 5
 6
 7
 8
 9
10
11
12
|
# 直接敲下面命令时报错
git push origin xiaohuang  # 或 git push
# ! [rejected]        xiaohuang -> xiaohuang (fetch first)
# error: failed to push some refs to 'https://github.com/magictomagic/WebSimplifyHUB.git'

# 1. pull
git pull origin xiaohuang  # 或 git pull

# 2. 解决冲突
vim xxx

# 3. add commit push
|
保持 fork最新
1
2
|
git fetch  # 看一看
git pull origin xiaohuang  # 或 git pull 下载
|
跟踪
若分支的 push 和 pull 不想跟 origin xiaohuang(直接 pull 和 push)
 1
 2
 3
 4
 5
 6
 7
 8
 9
10
11
12
|
# 1. clone 后自动为master做跟踪

# 2. 本地没有分支
git checkout --track 远程跟踪分支(remote/分支名)

# 3. 本地已经创建了分支
git branch -u 远程跟踪分支(remote/分支名)
# e.g.
# magic@LAPTOP-0QROVKKB MINGW64 /d/mtm-github/WebSimplifyHUB (xiaohuang)
# $ git branch -u remotes/origin/xiaohuang
# Branch 'xiaohuang' set up to track remote branch 'xiaohuang' from 'origin'.
|
git 限制
eslint
--save-dev
package.json中script
1
2
|
"lint": "eslint ./src"
"lint:create": "eslint --init"
|
eslint ./src自动校验src目录下的所有.js文件。
eslint --init生成.eslintrc.js文件,提供编码规则(去官网学习)。
- 安装后,先改
package.json文件,再npm run lint:create后进行一系列的选择来创建规则
husky
--save-dev
要git init后才可以装,在git commit前要通过npm run lint检查
老版(config文件)和新版(命令行参数)配置方法不一样,去官网看看
1
|
npx husky add .husky/pre-commit "npm run lint"
|
gitignore
github上有模板
1
2
3
4
5
|
* 匹配任意字符
? 匹配一个字符
** 代表匹配多级匹配目录
/dist/ 只忽略根目录下底下
node_modules/ 忽略所有这种目录
|
gitflow
猜测:场景映射工作流
Author
magictomagic
LastMod
2021-02-28
License
Creative Commons Attribution-ShareAlike License